Sunday, November 15, 2020

Creating Materialized Views in R12.2.x

- In 12.1.3 where we create a materialized views with simple CREATE statement but in 12.2.x, we need to do below steps –


- Create a logical view

- Use ad_zd_mview upgrade script to create a materialized view.

- Oracle internally creates required edition materialized view.


e.g.

- Create a logical view. Basically, create a normal view but suffixed by the #

CREATE OR REPLACE VIEW APPS.XYZ_VIEW_NAME# AS

<query>;


- Upgrade to materialized view. The first parameter is the schema name and second is the view name without #


BEGIN

AD_ZD_MVIEW.UPGRADE('APPS', 'XYZ_VIEW_NAME');

END;


- Verify all components


SELECT * FROM dba_objects WHERE object_name LIKE 'XYZ_VIEW_NAME%';


You should see below 3 components


- XYZ_VIEW_NAME# : LOGICAL VIEW

- XYZ_VIEW_NAME : TABLE

- XYZ_VIEW_NAME : MATERIALIZED VIEW


To access the materialized view just query on XYZ_VIEW_NAME (without # suffix)

SELECT * FROM XYZ_VIEW_NAME;


Share:

Friday, September 18, 2020

Replace SQL Loader with Interactive Data Loader in Oracle APEX

Are you still using the age-old SQL Loader to load your data files in Oracle tables ? While it has it's own advantages, it certainly doesn't deliver a pleasant user experience, let alone the need of having Unix box access to place/upload data files on specific folders so that SQL Loader can read them from there.


In comes the Oracle APEX Data Load wizard that lets you create Interactive data load pages delivering a wonderful user experience and thereby eliminating a need of uploading data files on a Unix box and having SQL Loader run/load them.


Let's see how to create the Data Loader in Oracle APEX.


- First, create a brand new page in your application

- Select Page Type as 'Data Loading' -


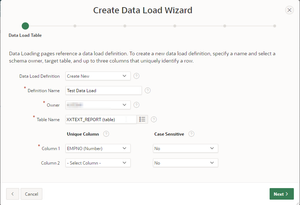
- This will guide you through the Data Load Wizard.

- Enter Data Load Definition Name

- Select the destination Table where the data will be loaded when users use this feature

- Select at least one Unique Column that serves as a primary key in the table


- You can create Transformation Rules to transform data in any of the columns, if needed -


- You can also add lookups for any of the columns, if needed -


- Enter desired Page Numbers and Page Names for the pages in Data Load process -


- Create a new Navigation Menu Entry so that User can access the newly created Data Load process -


- Indicate which pages the Data Load process should navigate to in case it's cancelled or even when it's successfully finished -


- Click Create to finish creating the new Data Load wizard.


Loading data using newly created Data Load process -


- Users can either upload a data file (CSV or TSV) by selecting option 'Upload file, comma separated (*.csv) or tab delimited'

- OR Users can also copy and paste contents of Data File in the box below by using option 'Copy and Paste'

- Users can mention whether data is separated by Comma or Tab (or any other character) by entering desired value in 'Separator' field


Next page will show you the column mappings and users can change/correct the mappings, if needed -


Next page will show users that all the data has been validated successfully and is ready to load -


- Upon clicking Load Data, the wizard will load all the data into the table and final page will be displayed with data load results -


- Here, we can see all the records are successfully loaded into the table -


Share: