Monday, August 11, 2025

How to enable OCI Object Storage Buckets over SFTP using S3 Compatibility API and SFTPGo

Managing file transfers securely and efficiently is a critical requirement for many organizations, especially when integrating cloud storage into existing workflows. When it comes to Oracle Cloud Infrastructure (OCI), the Object Storage service is widely used for its durability, scalability. It's a internet-scale, high-performance storage platform offered by OCI which is scalable, flexible and offers greater data durability and resiliency.

However, many applications and legacy systems still rely on SFTP for file transfers. In such cases it gets tricky to get the data files transferred between such legacy systems and the OCI cloud platform.

By combining OCI Object Storage with S3-compatible endpoints and a lightweight, open-source tool like SFTPGo, we can seamlessly enable SFTP access to our OCI Object Storage buckets without restructuring existing processes. 

This article will explain step by step process on how to configure OCI Object Storage over SFTP using the S3 Compatibility API and SFTPGo, enabling secure, familiar file transfer workflows in a modern cloud environment.


High level steps
:

1. Create Bucket and Enable S3 compatible API

2. Generate Client Secret keys

3. Provision SFTPGo on OCI instance

4. SFTPGo configurations

5. Test the OCI bucket connectivity over SFTP


Let's dive in.


1. Create Bucket and Enable S3 compatible API

- Navigate to the Tenancy details 


- Once on Tenancy details page, note down the Compartment listed under Amazon S3 Compatibility API designated compartment as well as the Namespace of the Object Storage


If you wish to change the Amazon S3 compatible compartment, then you can do so by clicking 'Edit object storage settings' button and changing the S3 compatible compartment


- Let's create a new bucket in the above mentioned Compartment, as shown below. Let's name it sftpbucket


- Now that we've created a bucket under S3 compatible compartment, let's move on to step 2.


2. Generate Client Secret keys

- Navigate to profile and go to the User details page


- Go to Token and Keys section


- Scroll down to Customer Secret Keys section and click Generate secret key


- Give a relevant name to the key like sftogo and click Generate

- At this stage, it will generate the key and also show you the Secret.

Make sure to note the Secret down as it won't be displayed again after this stage.

- Also, note down the newly generated Key 


3. Provision SFTPGo on OCI instance


- Navigate to Compute -> Instances


- Create a new instance (or you can use your existing instance)

- If you are creating a new instance then below references may help:


Placement: AD 1

Image: Oracle Linux 9

Shape: VM.Standard.A1.Flex

Shape build: Virtual machine, 1 core OCPU, 6 GB memory, 1 Gbps network bandwidth

- While provisioning new instance, you'll be given an option to generate Private-Public key pair. Download the Private key and store it on your machine.

- Once you enter the instance, navigate to Instance access section and note down the Public IP Address and username (usually opc)


- Open command prompt on your machine

- Run below command

ssh -i <private key file path on your machine> opc@<public IP address)


- This will let us in the new instance, and you should see the shell prompt similar to this


- Now let's run below commands in the given sequence:


Create the SFTPGo repository:

ARCH=`uname -m`

curl -sS https://ftp.osuosl.org/pub/sftpgo/yum/${ARCH}/sftpgo.repo | sudo tee /etc/yum.repos.d/sftpgo.repo


Reload the package database and install SFTPGo:

sudo yum update

sudo yum install sftpgo


- At this stage we are done installing SFTPGo on our instance.

- Now, let's start the SFTPGo service and enable it to start at system boot:


sudo systemctl start sftpgo

sudo systemctl enable sftpgo

At this stage, we've started the SFTPGo server on our OCI instance.


SFTPGo server runs on the Public IP address of our instance and at the port 8080


Let's make sure we open this port in our firewall config.


Run this command to see the current firewall config

sudo firewall-cmd --list-all


Run below commands to add the port 8080 to firewall config and reload it

sudo firewall-cmd --add-port=<port_number>/tcp --permanent

sudo firewall-cmd --reload


At this stage we have completed all the configurations in installting and enabling SFTPGo on our OCI instance.


4. SFTPGo configurations


- SFTPGo WebUI is accessible at this URL: http://<Public IP of your Instance>:8080/web/admin


- Let's go to this URL in Chrome browser


- We'll be presented to configure Admin account upon accessing this URL first time


- Setup the Admin user name and Password and Save.


- Let's login to WebAdmin as the admin


- Once we login as Admin, we should see below page:


- Let's create a sftp user that will be used to access our Object Storage bucket


- Click Add


- Let's name our user sftpgo_user and provide a strong password


- Scroll down to File system section and fill-in below details:


Storage: S3 (Compatible)


Bucket: Bucket name from OCI Object Storage obtained from Step 1


Region: Your OCI Region


Access Key and Access Secret: Obtained from Step 2


Optionally, you can mention Key Prefix if you want to restrict access to a particular folder in the bucket and not provide access to the whole bucket.

For example if your bucket has a folder named SFTPFiles and you want SFTP User to have access only to this folder then you can mention SFTPFiles/ in the Key Prefix.


Now, we need to enter S3 compatible endpoint of our namespace in which the bucket resides.

The syntax for compatible endpoint URL is:


https://{object-storage-namespace}.compat.objectstorage.{region}.oraclecloud.com


So your endpoint URL will look similar to this -


- Click Save to create the SFTP user


- Once created, the Admin can see the user and it's status on the Users page


- At this stage we've completed all the SFTPGO configurations


5. Test the OCI bucket connectivity over SFTP


- Let's login to WebClient as the sftpgo_user


-
On the Files page, we can either create a New Folder or Upload a new File


- Create a new folder names test


- Let's upload a test file as well


We will be able to see the new folder and the newly uploaded file on SFTPGo Web Client


- Now, let's navigate back to the OCI Object Storage bucket and see if these new objects are available there


As we can see, both the folder and the file are available on our bucket -


Conclusion:


By combining the power of OCI Object Storage with the flexibility of SFTPGo and the S3 Compatibility API, organizations can modernize their file transfer infrastructure without disrupting existing processes. This solution offers a secure, cost-effective, and scalable way to support SFTP workflows while taking full advantage of cloud storage. Whether you're migrating legacy systems or building hybrid environments, this approach bridges the gap between traditional file transfer needs and modern cloud capabilities.


Share:

Friday, August 1, 2025

How to utilize OCI Event Notifications to monitor OCI Data Integration (OCI-DI) task runs

In the previous post, we learned about the OCI Data Integration tool and it's core components like Data flows, Pipelines and Tasks etc.

As we saw, OCI-DI data integrations and the pipelines are executed through various Tasks. Now the question arises that what kind of mechanism we can put in place to monitor these run and automatically send notifications to the support team ?

Typically, OCI-DI Task runs result in generating OCI Events when tasks get completed (Success or Fail). Data Integration integrates with OCI public logging and monitoring for visibility by the users.

Let's take a look into the step by step process in setting up notifications on OCI events to monitor and alert on OCI-DI task tuns.


- Navigate to Developer Services and locate Notifications under Application Integration section


- We'll create a Notification topic here. Click Create Topic and let's name it OCI_DI_Notifications


- Now, we'll create a Subscription to this topic. Open the newly created topic and click Create Subscription.


- We can create subscriptions using a variety of protocols:

Email: Associates with an email address as input.
OCI Functions: Associates with a custom Function created in OCI
HTTPS: Associates with a custom HTTPS URL
PagerDuty: Associates with PagerDuty Events URL along with the Integration Key
Slack: Associates with Slack Webhook URL and Token
SMS: Associates with a Cell phone number with its Country Code


- For our use case, we'll use Email Protocol and use the desired Email Address where we want to receive the Alerts/Notifications.

- Once a Subscription is created, we'll see it's in Pending status


- This is because an email will be sent to the recipient and they need to respond to it to confirm that they wish to receive the Notifications from this subscription.

- The email will look like this -


- The recipient clicks Confirm Subscription and they should see this page


- Once the recipient confirms, the subscription will become Active in our OCI Topic.


- At this stage, we need to navigate to Observability and Management, go to OCI Events Service and click Rules.


- We'll be setting up the new OCI Event Rule here.

- Let's click Create Rule. I'll name it OCI_DI Notification Rule

- On the Rule Creation page, we'll see below options:

Condition:

- Event Type: Describes the type of OCI Event
- Attribute: Attribute details of various OCI-DI components such as Applications, Tasks etc.
- Filter Tag: OCI tags to be used as filters, if any.


- We'll use Event Type for our use case.

- Service Name: OCI lists all the available services here. We'll use Data Integration service for our monitoring purpose.


- Event Type: This lists all the possible OCI Events pertaining to a variety of OCI-DI operations at Workspace level and Task level.

- We'll select Task - Begin and Task - End so that we can receive a notification whenever a OCI-DI Task Starts and another one when it ends.


- In the View Example Events page, we can inspect what all information will be included in the Notification in JSON format and we can modify this as per our needs, if desired.


- Click Save Changes to save the Rule.


- At this stage, we've completed the Rule and Subscription for monitoring of OCI-DI Tasks runs. Let's test it.


- Navigate to Data Integration under Analytics and AI


- Navigate to the desired workspace and application.

- Let's locate the desired task and Run it


- The task will execute and complete in some time.

- We should receive two Email alerts, one when the Task run was Started and another one when Task run was Ended.


Notification on Task Start:


Notification on Task End:


Share:

Monday, July 14, 2025

Understanding Email security and Implementing Custom Domain Emails in Oracle Fusion Cloud using SPF and DKIM configurations

By default, any email notification sent from an Oracle Fusion Cloud environment will usually have From email address as <your pod>.fa.sender@workflow.mail.<your data center>.cloud.oracle.com

There are several use cases where Oracle Fusion subscribers would want to modify the 'From' email address in emails that get sent from Fusion Cloud applications.

Specifically, one would normally want to change the sending address in these emails to one that reflects their organization’s identity, instead of sticking to the default Oracle managed 'From' address that may expose the use of Oracle’s cloud infrastructure to their customers and contacts.


Although this change may seem simple. it comes with the need of implementing correct email authentication measures to avoid any possibility of phishing attacks and email spam.

Email authentication comprises a variety of measures that are designed to help recipients validate whether an email has really been sent from a particular sender. The right use of email authentication methods provides an increased level of security for both senders as well as recipients.


Sender Policy Framework (SPF) and Domain Key Identified Mail (DKIM) are two common forms of authentication. By adding this to our DNS entries, we're telling the recipients that we have authorized Oracle to send emails on behalf of our company's domain.


Sender Policy Framework (SPF):


SPF makes it possible to differentiate between the justified use of emails sent from an alternate domain versus using spoofing for malicious purposes. SPF utilizes the Domain Name System (DNS) infrastructure to register external servers that are authorized to send email on behalf of our company's domain. Once this configuration is in place, the email relay servers anywhere on the web can check emails sent with a custom From address and check DNS to see if the source servers are on the SPF list and therefore valid.
In short, SPF lets custom domain owners identify the servers they have approved to send emails on behalf of their domain.


DomainKeys Identified Mail (DKIM):


DKIM is used to verify the authenticity of email messages sent from Oracle Fusion cloud applications. DKIM authenticates emails through a pair of cryptographic keys. Email senders generate public and private key pairs. The public key is published to DNS records, and the matching private keys are stored in a sender's outbound email servers. The private keys generate message-specific signatures that are added to the embedded email headers. ISPs that authenticate using DKIM look up the public key in the public DNS record. This way they verify that the signature in the email header was actually generated by the matching private key. DKIM ensures that an authorized sender actually sent the message, and that the message headers and content were not altered during transit.


Process to configure SPF and DKIM in Oracle Fusion Cloud:


- Create a service request on the Oracle Support portal asking for SPF and DKIM configurations on the specific Pod of your choice. Please note that you will need to create a separate SR for each Pod in order to configure SPF and DKIM.

- Oracle will respond with SPF configuration details.

- Add a new SPF record to the domain of the from address to include the Oracle Cloud email delivery domain.

The SPF record statement is: include:spf_c.oraclecloud.com

- Validate the SPF record by using an SPF record checker tool. e.g. we can use the SPF Surveyor tool to authenticate our domain.

How to use the SPF Surveyor tool:

Navigate to https://dmarcian.com/spf-survey/

Here, we enter the domain we are using for the email, e.g. ourcompany.com

Click Survey domain.

A message is displayed indicating the validation results as shown below:


If there's a problem with the SPF configuration or if it's not been configured properly then we will see message as shown below:


- For DKIM configuration, we need to provide the below information in the SR:


Oracle Fusion environment Pod Name

The new custom domain based 'From' email address e.g. noreply@ourcompany.com

Key size: Default is 1024. One can change this to 2048, if desired.

DNS Selector name: Oracle generates this by default but one can specify a custom value, if desired. The default generated DNS selector uses this format: <env-name>-<region-code>-<date>


- Once this information is provided, Oracle registers the DKIM and responds to the service request with a DKIM-enabled DNS record.


Sample DKIM-enabled DNS record:

"key": "ORACLEABC1._domainkey.ourcompany.com",
"type": "TXT", 
"value":"v=DKIM1;k=rsa;p=MIIGIjEQWgkdkjgwdkjbnksjbnkwjnHnEGZXcJAHDBAB"


- We need to add this DNS record to our domain configuration and then update the service request confirming the changes we've made.


- At this stage, we have to wait for some time because Oracle has a process that runs every fifteen minutes to detect the DKIM stored in the customer DNS. After this step, Oracle (CNS) will start signing the emails. It usually takes somewhere between fifteen minutes to 24 hours for the DNS information to be detected by Oracle and for the DKIM process to therefore be successfully enabled. Once this process is completed, Oracle support engineer will respond on the SR.


- Once Oracle support responds, we need to verify that the signed email messages are delivered successfully. Once confirmed, we update the support request with confirmation.


- At this stage, Oracle support will change the 'From' email address in your Fusion Cloud environment to the new custom domain based DKIM-enabled address e.g noreply@ourcompany.com


Note: Please note that one needs to repeat these steps for each Pod by creating a separate SR for each Oracle Fusion Pod where the custom From email is required to be configured using SPF and DKIM.


Conclusion:

SPF and DKIM are critical components of email authentication and security in Oracle Fusion cloud. They prevent email spoofing and enhance the deliverability of enterprise emails.
These methods ensure that business communications remain trustworthy and secure. Organizations leveraging Oracle Fusion cloud and wishing to use custom domain based From email addresses, need to implement SPF and DKIM to safeguard their email ecosystem and enhance overall enterprise security.


Share:

Wednesday, July 2, 2025

How to dynamically extract metadata definitions in Oracle APEX

I recently came across a requirement where I needed to dynamically extract metadata definitions (such as column names, data types, etc.) of a variety of objects such as Tables, Views etc.


I achieved this using apex_data_export API in Oracle APEX. It’s important to note that apex_data_export is primarily used to export data and not the metadata. So to extract metadata definitions dynamically, we must first query metadata from data dictionary sources, and then pass that query result to the API call.


Let's see it in action.


Here's a sample PL/SQL block using apex_data_export to get Metadata:

DECLARE
    l_context apex_exec.t_context; 
    l_export  apex_data_export.t_export;
BEGIN

    l_context := apex_exec.open_query_context(
        p_location    => apex_exec.c_location_local_db,
        p_sql_query   => 'select column_name, data_type, data_length from all_tab_cols where table_name=' || '''' || 'AJ_AP_INV' || '''');

    l_export := apex_data_export.export (
        p_context   => l_context,
        p_format    => apex_data_export.c_format_csv,
        p_file_name => 'AJ_AP_INV.csv' );

    apex_data_export.download( p_export => l_export );

    apex_exec.close( l_context );

EXCEPTION
    when others THEN
        apex_exec.close( l_context );
        raise;
END;


Now, let's incorporate this in an APEX page and invoke it upon a Button press.

- Let's create a Process in After Submit section

- Set above code in PLSQL section -


- Let's set the Server-side condition When Button Pressed to our export button


- That's it. Now when we run the app and click the Export button, it will automatically download the Metadata definition of our sample table AJ_AP_INV


- Now, if we open the downloaded file, we will be able to see the metadata of this table -


How it was used in my use case:


- My requirement was to obtain metadata definitions of Public View Objects (PVOs) and their underlying tables.

- In this case, the data lineage information for PVOs was ingested into Autonomous database which was accessed by APEX. The table holding all the PVO information was XXCUST_FSCM_DATA_LINEAGE

- To provide more perspective, let's take an example of FscmTopModelAM.AnalyticsServiceAM.TerritoriesPVO.

This PVO essentially contains columns from FND_TERRITORIES_B and FND_TERRITORIES_TL.

Now we want our solution to extract Metadata definition of this PVO as well as metadata definitions of both the underlying tables.

Let's see how this was achieved.

- I created a new page with a text box accepting the PVO name and three buttons to export metadata of PVO and the underlying tables.


- I created a new process to export PVO metadata by using below PL/SQL block and set it to trigger upon click of PVO button:

DECLARE
    l_context apex_exec.t_context; 
    l_export  apex_data_export.t_export;
BEGIN

    l_context := apex_exec.open_query_context(
        p_location    => apex_exec.c_location_local_db,
        p_sql_query   => 'SELECT LISTAGG(VIEW_OBJECT_ATTRIBUTE, '''|| ',' || ''') WITHIN GROUP (ORDER BY NULL) "Col"
FROM   XXCUST_FSCM_DATA_LINEAGE
WHERE  VIEW_OBJECT = :P_PVO_NAME' );

    l_export := apex_data_export.export (
        p_context   => l_context,
        p_format    => apex_data_export.c_format_csv,
        p_file_name => :P_PVO_NAME );

    apex_data_export.download( p_export => l_export );

    apex_exec.close( l_context );

EXCEPTION
    when others THEN
        apex_exec.close( l_context );
        raise;
END;


- Similarly, I created two more processes, one for each underlying table using below code and set it to trigger upon click of each table button:

DECLARE
    l_context apex_exec.t_context; 
    l_export  apex_data_export.t_export;
    CURSOR c1 IS
        SELECT DATABASE_TABLE TABLE_NAME
        FROM
        (
        SELECT DATABASE_TABLE
        ,row_number() over (order by NULL) rnum
        FROM(
        SELECT DISTINCT DATABASE_TABLE
        FROM   XXCGI_FSCM_DATA_LINEAGE
        WHERE  VIEW_OBJECT = :P_PVO_NAME
        ORDER BY 1
        )
        )
        WHERE rnum=1;
BEGIN

    FOR I IN c1
    LOOP
        
        l_context := apex_exec.open_query_context(
        p_location    => apex_exec.c_location_local_db,
        p_sql_query   => 'SELECT LISTAGG(DATABASE_COLUMN, '''|| ',' || ''') WITHIN GROUP (ORDER BY NULL) "Col"
FROM   XXCUST_FSCM_DATA_LINEAGE
WHERE  VIEW_OBJECT = :P_PVO_NAME
AND    DATABASE_TABLE='|| ''''||I.TABLE_NAME|| '''');

    l_export := apex_data_export.export (
        p_context   => l_context,
        p_format    => apex_data_export.c_format_csv,
        p_file_name => I.TABLE_NAME );

    apex_data_export.download( p_export => l_export );

    apex_exec.close( l_context );

    END LOOP;

EXCEPTION
    when others THEN
        apex_exec.close( l_context );
        raise;
END;


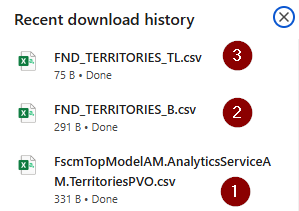
- Let's run the app, provide the PVO name and click the three buttons to see the result


- As we can see, it downloaded three files, one for PVO meta definition, one for table #1 and another for table #2.


Possible Use cases:

This mechanism would certainly come handy in below use cases and many more:

• Dynamically inspecting a table/view

• Building data dictionaries

• Exporting data structure to Excel

• Validating report configuration dynamically

Share:

Monday, June 23, 2025

How to integrate Google Auth with Oracle APEX using Social Sign-In feature

Oracle APEX has a number of options for letting users sign into the application. It ranges from authentication using Apex Users to Database Users and even custom sign-in options. But all of these come with an overhead of maintaining the user records in a database and naturally managing the security options such as password management, account expiration thresholds and resetting the user credentials.

So what if there's option that eliminates all of this and let's us design our App in such a way that users can login using a known third-party authentication such as Google Auth ? Well, Oracle APEX Social-Sign in features let's us do exactly the same. Let's see how to do it.

Configure Google OAuth Credentials:


- Login to Google Developer Console: https://console.developers.google.com

- Create a new project


- Navigate to OAuth Consent Screen


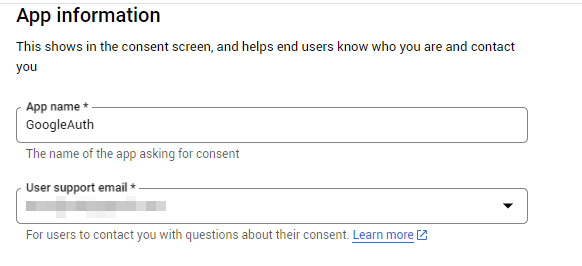
- Create a app registration and give some name to this app and provide your email address for communication


- Scroll down and navigate to Authorized Domains section


- Enter oraclecloudapps.com as an authorized domain


The reason behind selecting this domain is that when you run your Apex App, you will see  oraclecloudapps.com domain in the App URL Hence we are going to add it to the authorized domain list in Google developer console.


- Now, let's navigate to Credentials section


- Create credentials


- Create OAuth Client Id


Select Application Type as Web Application


Provide a relevant name for use case


Authorized Redirect URLs:


Here, enter your Apex App URL till /ords part and append /apex_authentication.callback after that.


For example if your App URL looks like this https://xyz1234-abcd1234.adb.us-chicago-1.oraclecloudapps.com/ords/appname/home then enter https://xyz1234-abcd1234.adb.us-chicago-1.oraclecloudapps.com/ords/apex_authentication.callback as Redirect URL.


- Click Create


- This will create a new Client Id and Client Secret. Make a note of these values.


- Navigate to the Apex App we want to incorporate with Google Auth


- Navigate to Shared Components


- Navigate to Credentials option under Workspace Objects


- Create a new Web Credential


- Provide a relevant name like Google Auth


- Select Authentication Type as OAuth2 Client Credentials Flow


- Provide Client ID and Client Secret obtained from Google developer console.


- Apply Changes


- Now, navigate to Shared Components


- Navigate to Authentication Schemes under Security section


- Create a new Authentication Scheme


- Enter a relevant name to scheme


- Select Scheme Type as Social Sign-In


- Select our newly created Credential Store 'Google Auth'


- Select Authentication Provider as Google


- Apply Changes


- Make sure the newly created Authentication Scheme is set as active scheme. If not, then click Make Current Scheme button to set it as an active scheme for the App.


- And that's it ! We have finished all the configuration to authenticate our App using Google Auth.


- Let's run the application.


- Voila ! We are presented with the familiar Google Auth screen that will let you login with any of your Google Accounts or will show you the active Google Accounts based on your active browser sessions.


- Once, we select any of our Google accounts (or login using a new one), the authentication will be complete and we will enter our application.


Note:

With all above configurations, we created Google Auth credentials only to enable the Google Auth feature for the Oracle APEX domain.

The Oracle APEX App as well as the Google Developer account do not capture or store other users' login credentials nor share the Google account details used to setup the Credentials Store with anyone else.

This method is safe and low maintenance and it only facilitates the authentication to our App using Google Auth.


Share: