Ever wondered how can we Personalize seeded pages in Oracle Fusion, like we used to do in the eBusiness Suite (EBS) ?
Well, it's possible to achieve this to some extent by leveraging Sandbox feature in ERP Cloud.
Sandbox ? What's that ?
Sandbox is an out-of-box tool provided by Oracle Fusion to perform customizations in isolation without impacting other configurations in the given environment. Sandbox is a logically isolated area in your environment where you can do your Personalizations/Customizations and test them without interfering with those pages in the real world. While you are configuring and testing these changes, other users won't see any of them until you Publish the Sandbox.
Sandbox essentials in a Nutshell:
- Only one sandbox can be active at a given point of time.
- Once the Sandbox is activated, it's name is displayed in the global area.
- Ensure to log out from Oracle Fusion and log back in after activating a Sandbox. This is to ensure that the cache is cleared and it helps avoid conflicts.
- A sandbox will remain active until
- You exit the sandbox
- Publish the sandbox
- Delete the sandbox
- Set another sandbox as Active - Oracle Fusion patches usually retain the changes from Published Sandboxes but any unpublished Sandboxes may not work if the Oracle Patch brings new changes to the given page which effective make such Sandboxes obsolete/incompatible. It's better to create new Sandbox in such cases.
Steps to create and activate a Sandbox
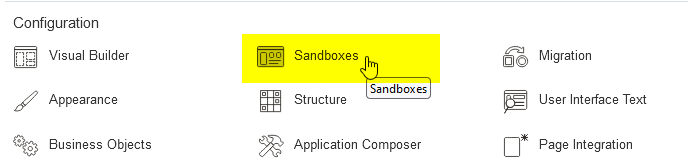
1. Click on Navigator, go to Configuration Menu and select Sandboxes
Alternatively, you can enter Sandbox area by clicking User Menu on Top Right and then selecting Edit Pages under Administration menu
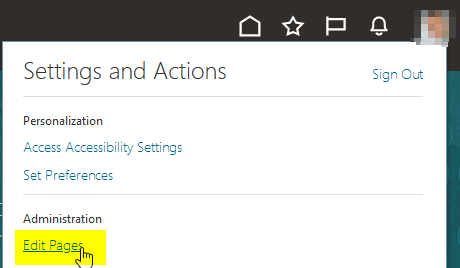
If you follow this path, you will see a pop-up message as shown below. Click on "Activate a sandbox" option and it will take you to the Sandbox area (same as above step).

2. Once the Sandboxes window is opened, you can click on Create Sandbox button from Available Sandboxes tab

3. Let's name our Sandbox as "TestSandbox" and set Publishable to Yes. We can select and use many Tools under this Sandbox.
For our example, let's select Page Composer tool and click Create and Enter button.

4. Once you enter a Sandbox, it's name will appear on top indicating that you are now working in a Sandbox environment and whatever changes you do will be visible to you alone.

5. Let's click on Home button to go to our Homepage

6. In our example, we are going to Personalize Create Invoice page under Payables business area
7. Navigate to Payables -> Invoices from within the Sandbox environment (while Yellow Sandbox bar appears on the top of the window)

8. Let's open the Create Invoice page

9. Navigate to Tools menu under Sandbox area and select Page Composer

10. Once you are in Page Composer mode, you will see more tools and table in the top region

11. Click on Select tab

12. Now, let's say we want to Hide the Description field on this page.
Click on the area around Description field and you will see a small pop-up showing options to Edit this area

13. Click on Edit Component option
14. You will see a pop-up window showing Component Properties for "Description:"
Here, let's uncheck "Show Component" option and click Ok

15. Once you return to the Create Invoice page, you will see "Description" field has now disappeared

16. With this, we've achieved to Personalize/Customize "Create Invoice" page but remember, this change is only applicable to this Sandbox and is not visible to other users.
17. Now, let's see how we can publish this Sandbox so that this change gets applied across the actual environment and will be visible to all the users.
18. Navigate to right top area on this page and click Close

19. Click on the Sandbox name on top left cornet (TestSandbox in our case) and click Publish

20. You will see below pop-up indicating that you will be taken to Sandbox page to publish this Sandbox. Click Yes

21. Once you land on Sandbox page, you can verify the Sandbox Name and Current Status.
You can also see/verify the actual page name that was modified as part of this change.
Click on Publish button and you will see a final pop-up box asking for final confirmation.
Click Yes to Publish this Sandbox
Please note: Publishing a Sandbox is an irrevocable activity; so please take this action only after you are certain about all the changes.

22. Once the Sandbox is published, navigate to the same "Create Invoices" page in Payables
Here, we will see that the "Description" field is now hidden on the actual page as well.

7. Navigate to Payables -> Invoices from within the Sandbox environment (while Yellow Sandbox bar appears on the top of the window)
8. Let's open the Create Invoice page
9. Navigate to Tools menu under Sandbox area and select Page Composer
10. Once you are in Page Composer mode, you will see more tools and table in the top region
11. Click on Select tab
12. Now, let's say we want to Hide the Description field on this page.
Click on the area around Description field and you will see a small pop-up showing options to Edit this area
13. Click on Edit Component option
14. You will see a pop-up window showing Component Properties for "Description:"
Here, let's uncheck "Show Component" option and click Ok
15. Once you return to the Create Invoice page, you will see "Description" field has now disappeared
16. With this, we've achieved to Personalize/Customize "Create Invoice" page but remember, this change is only applicable to this Sandbox and is not visible to other users.
17. Now, let's see how we can publish this Sandbox so that this change gets applied across the actual environment and will be visible to all the users.
18. Navigate to right top area on this page and click Close
19. Click on the Sandbox name on top left cornet (TestSandbox in our case) and click Publish
21. Once you land on Sandbox page, you can verify the Sandbox Name and Current Status.
You can also see/verify the actual page name that was modified as part of this change.
Click on Publish button and you will see a final pop-up box asking for final confirmation.
Click Yes to Publish this Sandbox
Please note: Publishing a Sandbox is an irrevocable activity; so please take this action only after you are certain about all the changes.
22. Once the Sandbox is published, navigate to the same "Create Invoices" page in Payables
Here, we will see that the "Description" field is now hidden on the actual page as well.
This way we can create and publish a Sandbox to achieve Personalizations/Customizations on Oracle Fusion pages.


