Wednesday, March 8, 2023

Extend EBS workflows using Oracle Business Event System

So, we all are aware of Workflows in EBS but do you know we can extend the workflow functionality using Business Events ? Let's see how.


Oracle Business Event System .. what's that ?

  • Business Event System is an application service that leverages the Oracle Advanced Queuing (AQ) infrastructure to communicate business events between systems
  • Mainly consists of the event manager and process event activities
  • Event Manager –
      - Contains a registry of business events, systems, communication agents within those systems, and subscriptions for a given event
      - Events can be raised/received from an external system or the local system through AQ. When an event occurs, the subscribing code is executed in the same transaction as the code that raised the     event, unless the subscriptions are deferred
  • Each business event represents a ready to use integration or extension point
  • Oracle E-Business Suite currently ships preconfigured with over 900 business events


What's Oracle Advanced Queuing ?

  • It's a Message-oriented middleware (MOM) infrastructure that supports sending and receiving messages between distributed systems
  • AQ uses database structures as a repository for asynchronous queuing which acts as the main element in various Oracle related as well as heterogeneous operations
  • Oracle Advance Queuing does not support synchronous messaging
  • Oracle AQ supports PL/SQL, Oracle Cloud Infrastructure, Java Message Service and SOAP APIs

Messaging using Oracle Advanced Queuing

Messaging is the ability to send a message containing data from one application/process to another application/process and is widely used in distributed systems, particularly high volume OLTP systems

Client server applications are typically synchronous whereas messaging is asynchronous

In an asynchronous model, the sender, usually referred to as the producer, is not blocked waiting for a reply from the recipient(s), referred to as consumer(s)

Messages are placed into queues by Producer systems 
– This is called enqueuing

Messages are read & removed from the queue by Consumer systems 
– This is called dequeuing

The data section of the message is referred to as the payload


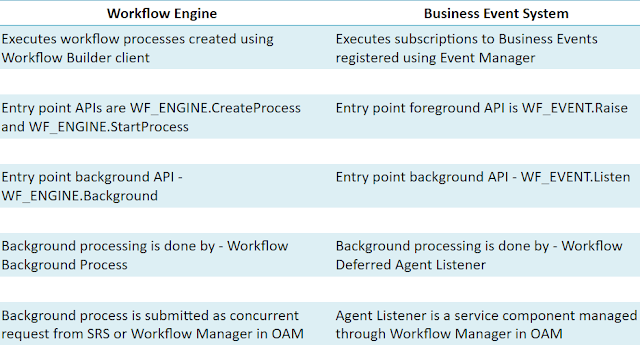
Now, let's see what's the difference between Workflow Engine vs Business Event System


What are Business Events ?

  • Business Event is an occurrence of a business activity which is significant to other objects or processes in a system or to external agents.

  • For example, the activity of creating a Purchase Order is a business event, similarly approving PO, receiving goods against a PO or matching a PO with invoice is a Business Event.

  • Business Event is a ready to use integration or extension point.

  • Business Events are integrated to specific business flows for additional processing or validations.

  • Examples of preconfigured Business Events –
oracle.apps.po.autocreate.pocreated
oracle.apps.po.autocreate.rfqcreated
oracle.apps.per.api.employee.create_employee
oracle.apps.wsh.delivery.gen.shipconfirmed

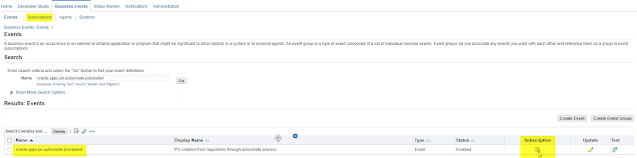
Navigation to access Business Events:


Uses of Business Events

System Integration Messaging hubs - 
Business Event System can serve as a messaging hub for complex system integration scenarios. The Event Manager can be used to "hard–wire" routing between systems based on event and originator.

Distributed Applications Messaging – 
Applications can supply Generate and Receive event message handlers for their business entities.

Message-based System Integration – 
You can set up subscriptions, which cause messages to be sent from one system to another when business events occur. In this way, you can use the Event Manager to implement point–to–point messaging integration.

Business event-based workflow processes – 
You can develop sophisticated workflow processes that include advanced routing or processing based on the content of Business Events.

Non-invasive customization of packaged applications - 
Create subscriptions to various Business Events to trigger custom code or workflow processes.


What are Event Subscriptions ?

  • An activity to be performed on occurrence of a Business Event.
  • For example, in order to send an email notification to users when a PO receipt is created, you can create a Subscription to PO Receipt related Business Event and trigger a workflow notification from the subscription to send email.
  • Whenever an Event is raised locally or received from an external source, the Event Manager searches for and executes any active Subscriptions for that event.
  • If multiple subscriptions are defined to the same Business Event, you can control the order in which the Event Manager executes those subscriptions by specifying a phase number for each subscription. Subscriptions are executed in ascending phase order.
  • Subscriptions can be executed immediately or be deferred
  • Immediate Subscriptions are Synchronous
  • Deferred Subscriptions are Asynchronous
  • The Event Manager determines the execution method based on Phase Number of a Subscription
  • Immediate (Synchronous) Subscriptions have Phase <= 99
  • Deferred (Asynchronous) Subscriptions have phase > 100
  • Deferred subscription events are enqueued to WF_DEFERRED AQ and Workflow Agent Listener dequeues/executes them in the background
  • All events with Synchronous subscriptions are executed in the same thread they are raised in and not enqueued to any AQs
Navigation to access Event Subscriptions:


Sample Subscription Definition:


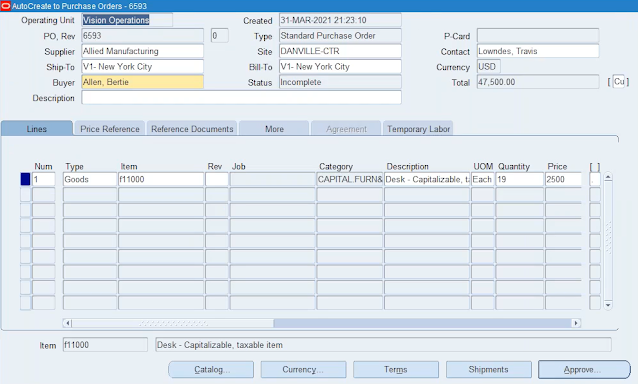
Let's auto-create a PO for testing:


We'll be able to see below entries in WF_DEFERRED table for above PO:

One entry for Auto-create and one for Notification


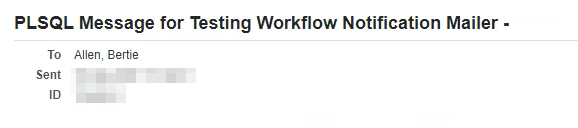
And now, if we head back to Application, we'll be able see the custom notification 


Below are some Possible Use Cases using Business Event System:

Subscriptions can include the following types of processing –
  • Executing custom code on the event information
  • Sending event information to a workflow process
  • Sending event information to other queues or systems
  • Sending a notification based on the event information
  • Sending or receiving an Oracle XML Gateway message
  • Invoking a business process execution language (BPEL) process or other Web services

This topic was presented in one of my OATUG webinars. Please find the details below for full presentation and demo:

Webinar

Presentation and Demo


Share:

Monday, March 6, 2023

How to build a custom reset password feature in Oracle APEX


So, there's often a requirement to provide the "Reset Password" option to end-users of an Oracle APEX application. Of course, this is based on the fact that the authentication is done using APEX credentials and not based on any other external methods, such as EBS or Active Directory etc.

In such scenarios, Oracle APEX doesn't provide any out-of-box Reset Password option to users. So what's the workaround ? Well, we need to build a custom solution to have this feature.

Let's see how this can be achieved.

Pre-check:

Please navigate to Shared Components -> Authentication Schemes

Make sure the Current scheme is set to Oracle APEX Accounts

Please note that below solution works only for this scheme and won't be applicable to any other authentication options.


1. Page for entering Email ID where user can receive Reset Password URL:

- Create a new blank page. Let's number it 8001

- Create a Text Field and name it P8001_EMAIL

- Create a button and name it Submit


- Set Page Authentication to Public because user must be able to access it without limitation of any credentials


- Set Session State Protection for P8001_EMAIL to "Restricted - May not be set from browser"
This is to prevent possibility of URL Tampering. This way if the user tries to modify the URL in any way then it will give the error.


- If we run this page at this stage, it should look like this


2. Create a Link on seeded Login Page pointing to above Page :

- Now, let's create a link to this page on the actual login page

- Navigate to Page#9999 which is the standard login page in APEX

- Create a new button under Language Selector region and name it Reset Password


- Under Behavior section, set Action to Redirect to Page in this Application and Target to Page 8001


- If we run this page at this stage, it should look like this


- If we click on Reset Password link, it will take us to the newly created Page#8001


3. Add logic on the newly create Email Page from Step 1:

- Navigate to Page#8001

- Now, let's fetch the User Name associated with this EMAIL ID as we need to use it in further steps

- Create a new item named P8001_USER_NAME and set the Type to Hidden


- Set Session State Protection for P8001_USER_NAME to "Restricted - May not be set from browser"
This is to prevent possibility of URL Tampering. This way if the user tries to modify the URL in any way then it will give the error.


- Now, let's create a Computation for this item

- Right click on P8001_USER_NAME and select Create Computation


- Create computation with below details

  Point: After Submit

  SQL Query:
  SELECT USER_NAME
  FROM   APEX_WORKSPACE_APEX_USERS
  WHERE  UPPER(EMAIL) = UPPER(:P8001_EMAIL);

   Server-side Condition:
   Type: Item is NOT NULL
   Item: P8001_EMAIL 


3. Create a new Page to let user enter New Password

- Create a new blank page. Let's number it 8002

- Set Page Authentication to Public because user must be able to access it without limitation of any credentials


- Create a new Text Item named P8002_PASSWORD and set Type to Password


- Set Session State Protection for P8002_PASSWORD to "Restricted - May not be set from browser"
This is to prevent possibility of URL Tampering. This way if the user tries to modify the URL in any way then it will give the error.


- Create a new button named Submit with Action as Submit Page


- Now, create a new item named P8002_USER_NAME and set type to Hidden and Disable Value Protected option


- Set Session State Protection to "Checksum Required - Application Level" under Security section.
This way if the user tries to modify the User Name value in URL in any way then it will give the error.
We are setting the checksum at application level as the same user may be having access to other applications and we want to limit this restriction for our application only.


4. Generate Reset Password Link and Email to User

- Navigate to Page#8001

- Create a new item named P8001_LINK and set type to Hidden

- Go to Processes and Create a new Process named Generate Link.

Here, we are essentially using GET_URL API to generate the link pointing to our App (Identified by :APP_ID), Page 8002 and we are passing user name as the parameter for the item :P8001_USER_NAME

  PL/SQL Code:

  DECLARE
    LV_LINK VARCHAR2(4000);
  BEGIN
    LV_LINK := APEX_PAGE.GET_URL(
                                P_APPLICATION => :APP_ID,
                                P_PAGE        => 8002,
                                P_SESSION     => NULL,
                                P_ITEMS       => 'P8002_USER_NAME',
                                P_VALUES      => :P8001_USER_NAME
                                );
       :P8001_LINK := REPLACE(apex_mail.get_instance_url,'/ords/','') || LV_LINK;                            

  EXCEPTION
    WHEN OTHERS THEN NULL;
  END;

  Server-side Condition:
  Type: Item is NOT NULL
  Item: P8001_USER_NAME


- Create another process named Send Email with below details

  Type: Send E-Mail

  From: <From Email ID>

  To: &P8001_EMAIL.

  Subject: Reset Password

  Body:
  Please follow the below link to reset your Password:

  &P8001_LINK.

  Send Immediately: Yes

  Server-side Condition:
  Type: Item is NOT NULL
  Item: P8001_USER_NAME


Ensure to check Send Immediately check-box. This is essentially like implicitly issuing APEX_MAIL.PUSH_QUEUE api which sends the email instantly.

More details on PUSH_QUEUE here.


Here, make sure to use the From Email Id based on the Email Delivery configuration done in OCI. Please refer to my previous blog post to understand how to do this configuration.

- Now, this page is ready so let's test it

- Run this page and enter a valid Email ID and click Submit


- We should receive the Reset Password email with the URL pointing to Page 8002 along with the User Name and Checksum passed via the URL


4. Update the Password for the user returning via above URL

- Navigate to Page#8002

- Create a new item P8002_DISP_USER on this page. This is to show the user name for whom the password it being reset.


- Set this item to Display Only


- In the Source, set Type to Item and Item to P8002_USER_NAME


- Set Session State for this item to Per Session


- If we run the page at this stage using the URL received in the email, then it should look like this. We should be able to see the User Name to whom the Email was set indicating that the password will be reset for this user.


- Now, let's create a new Process named Reset Password with below details

  Language: PL/SQL

  Code:

  BEGIN

    APEX_UTIL.RESET_PASSWORD(P_USER_NAME => UPPER(:P8002_USER_NAME),
                             P_OLD_PASSWORD => NULL,
                             P_NEW_PASSWORD => :P8002_PASSWORD,
                             P_CHANGE_PASSWORD_ON_FIRST_USE => FALSE
                            );

  EXCEPTION
    WHEN OTHERS THEN NULL;
  END;
  
  Success Message: Your password has been reset successfully.

  Server-side Condition:
  Type: Item is NOT NULL
  Item: P8002_USER_NAME


Important:

APEX_UTIL.RESET_PASSWORD API can be executed only by someone who has Admin Role.


Hence, the custom schema/user where this app resides must be granted '
APEX_ADMINISTRATOR_ROLE' role in order to be able to execute above code.

If this configuration is not done, then you will see errors on the page as Reset Password API will fail due to insufficient privileges.

- Now, let's create a Branch to page 9999 so that user is redirected to seeded Login Page upon resetting the password


- That's it ! The Reset Password page is ready. Let's test the same.

- Click on the URL from the Reset Password Email

- Enter the new Password and click Submit


- Voila ! You should see the Success message and the control should return to the seeded Login Page


- Now you will be able to login using the newly reset password.


Share: