Friday, October 20, 2023

Steps to Migrate Financial Reporting Studio reports from one instance to another

Oracle Financial Reporting Studio is a tool that enables users create Financial Reports. These reports are built using data in the Oracle General Ledger balances cube. Some examples are company income statements, balance sheets etc. These reports are usually run by users in General Ledger.
Finance Reports created using FRS are stored and read from the Shared Folders -> Custom -> Financials path.

These reports are different in structure than BI Publisher or OTBI Reports; and hence the process to migrate them from one environment to another is also different than that of BIP or OTBI reports.

Let's see how we can migrate FRS reports from source to destination environment.

Before proceeding with below steps, ensure that the user has Application_Implementation_Consultant role.


Steps to be followed in Source Environment:

- Make sure all our FRS reports are available in /Shared Folders/Custom/Financials path.

- Navigate to Setup and Maintenance and click 'Manage Implementation Projects'


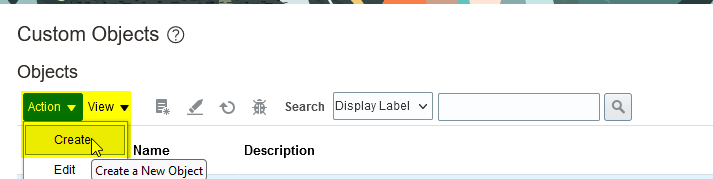
- Click 'new' to add a new implementation project.


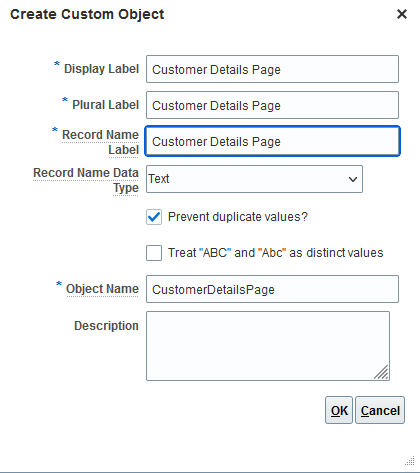
- Enter the project information and click Next.


- We need to ensure that 'include' check boxes are 'NOT SELECTED' for all the projects.


- Click Save and Open project

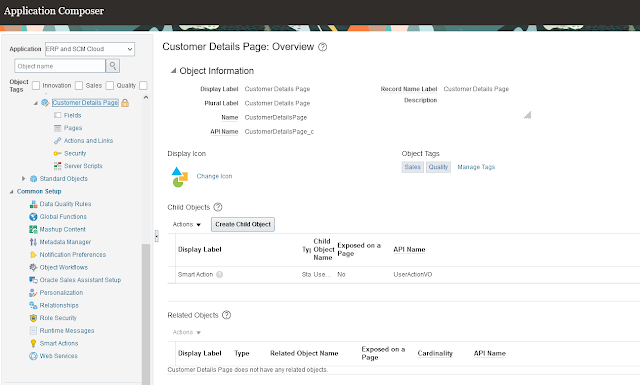
- We have created the custom Implementation Project.

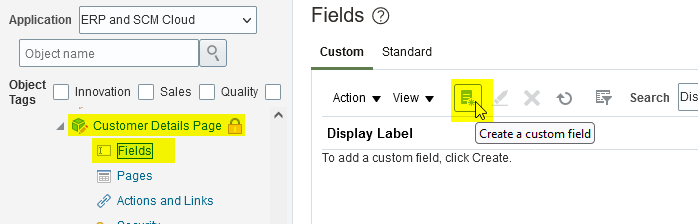
- Now we need to add the Task.

- Click 'New' to add a task.


- In the pop-up window, change type to Tasks and search for 'Create Financial Statements' task.

- Select 'Create Financial Reports' and click Done.


- Click 'Done' for the implementation project.


Now we need to create a configuration package and assign above implementation project to it.

- Navigate to Setup and Maintenance and click 'Manage Configuration Packages'


- Click 'New' to create a new configuration package.

- From the dropdown, select the implementation project created in above steps.


- It may show below message. This is because we have not selected aby offerings while creating Implementation Project. This is ok. Just click Yes.


- Review the details. Here we will be able to see 'Finance Reports' task based on our selections made during implementation project creation.

- Click Next and then Submit

- This will submit a job which will run for a few seconds.

- Refresh the status until we see the status as Completed.

- Download the 'Configuration Package' from the download link once the process is completed.


- Let's review the Configuration Package zip file. If we open this file on our local machine, we will see it contains a folder named 'businessObjectData'

- Open businessObjectData folder

- We will see another zip file named GL_FINANCIAL_REPORT.zip

- If we open GL_FINANCIAL_REPORT.zip file, it will contain another file named FR_Reports.zip

- Open FR_Reports.zip and you will see a folder/subfolder chain from shared -> Custom -> Financials

- Once you reach to Financials folder, you will see all your FRS reports located here. Report extension will be .DES


Steps to be followed in Target Environment:

- Navigate to Setup and Maintenance and click 'Manage Configuration Packages'


- Here we need to upload our zip file. So click 'Upload' and choose the configuration package (zip file) downloaded during above in export process.


- Click 'Get Details' button and it will show both the Configuration Package and Implementation Project details from the zip file.


- Click Submit

- This will submit a process under 'Export and Import Processes' section with Type = Upload. Refresh and wait for the status to change to 'Completed successfully'.


- Now, in the 'Export and Import Processes' section, select the above completed process (Type=Upload) and click 'Import Setup Data' button to import the data.


- Enter/accept the process details and click Next

- Here, we will see 'Financial Report' Business Object Service.


- Click Submit

- This will submit a process under 'Export and Import Processes' section with Type = Import setup data. Refresh and wait for the status to change to 'Completed successfully'.


- Once this process successfully completes, we will see all our FRS reports under /Shared Folders/Custom/Financials path and can be accessed by end users.


Share:

Thursday, October 19, 2023

How to Create Custom Pages using Application Composer in Oracle Fusion Cloud

"Can we have some new pages/forms created in ERP Cloud ?" or "Business requires to collect and maintain some additional information in ERP Cloud. Is this possible?"
These are some inevitable questions asked by many ERP users, especially after transitioning from Oracle EBS to Oracle ERP Cloud. Well, the answer is 'Yes'. 
Application Composer is a powerful tool that enables us to create custom pages as per business requirements. Let's see how to use Application Composer.


Roles Required:

First of all, in order to be able to access Application Composer tool, one needs to have
'Custom Objects Administration Role'. Role Code is ORA_CRM_EXTN_ROLE.
Additionally, one may be granted these roles:
Customer Relationship Management Application Administrator
Application Implementation Consultant
Master Data Management Application Administrator


Now, lets access Application Composer and we'll create a new page to capture view, and maintain Customer Details (PS. This has no relation to AR Customers. This will be an independent page with it's own data structure in the backend).

Activate Sandbox:

First of all, we have to activate a new Sandbox. Let's name it CustomerDetails and select Application Composer under Tools. Create and Enter the Sandbox.


Application Composer:

Now, you will see a new option named 'Application Composer' under Configuration menu. Open it.


Now we have entered the Application Composer tool.

Let's change Application to ERP and SCM Cloud.


Custom Objects:

Now you will see various options in the Right pane. Click on Custom Objects.

Now, enter the information in order to create new Custom Object as shown below:

Display Label: This defines a user-friendly name for an object.

Plural Label: The plural label is used when the object is displayed as the detail section of a master-detail page, such as on a subtab.

Record Name Label: This field is used to specify the display label for the object's RecordName field.

Record Name Data Type: Choose between Text or Automatically Generated Sequence.

Prevent Duplicate Values: With this box checked, one can prevent users from inputting duplicate record names.

Object Name: This is the internal identifier of the object and needs to be unique.

Description: Description of the object.


Now, our custom object named 'Customer Details Page' has been created.


Fields:

Now, we need to create the Fields. These are basically the columns we need to capture information into.

Navigate to Customer Details Page object and click on Fields in Left Pane.

Now, lets click Create a custom field button in Right Pane.


This brings a pop-up page asking for the Data Type for this field. Let's select Text for our use case and click OK.


Now, let's create three fields by following above process.

Customer Name:


Customer Email:


Customer Address:


Here, we have marked Customer Name and Customer Email fields as Searchable. This will enable users perform search on the existing data set based on these two fields.

Here's the snapshot of all our fields:


Pages:

Now, let's build the Pages and show above fields on the same for Viewing as well as Data Entry purpose.

Navigate to Pages and click on 'Create Default Pages'


We will see this message while it created Default Pages for us.


Once completed, we should see primarily three Pages -

Landing Page: As the name indicates, this is the first/landing page we will see when we enter Customer Details area.

Creation Page: This is the page which enables us to create new records and is shown when user clicks on Create button.

Details Page: This page lets us see more details of a particular record and is shown when user clicks on a particular record from the search results.


Now, let's click on Default custom layout option under Landing Page Layout


Here, click on Edit option under Summary Table


Now, let's select all the desired columns and move them to the Selected Fields section


Save and Close

Done


Similarly, let's click on Default custom layout option under Creation Page Layout


Here, we need to click Edit option under PageCreate section as shown below:


Now, let's select all the desired columns and move them to the Selected Fields section

Save and Close

Done


And finally, click on Default custom layout option under Details Page Layout


Here, we need to Edit the SubTab:Summary section as shown below:


Let's select all the desired columns and move them to the Selected Fields section


Save and Close

Done


At this stage, we are pretty much done with the steps to create our Customer Details page.

Here we can either chose to Preview the Sandbox OR Publish it.


OR


Using either of the above options, we will return to the home page of Fusion Applications.

Navigate to Others tab and we will see our newly creates 'Customer Details Page'.


OR the same can be accessed from the Others submenu under the hamburger menu:


Once we open the Customer Details, we will see below screen.

Here, we can see a section with No results found. This is our Landing page.


Let's click on Create button to open our Creation Page and well enter test data and Save.


Once we return to the Landing Page, we will now see the test Customer we just created.

Now, if we click on the Customer1 field, it will take us to Details Page where we will see all the details of this customer


Details Page:


This way we can create custom pages using the Application Composer tool in Fusion Cloud.


Share: