Monday, June 23, 2025

How to integrate Google Auth with Oracle APEX using Social Sign-In feature

Oracle APEX has a number of options for letting users sign into the application. It ranges from authentication using Apex Users to Database Users and even custom sign-in options. But all of these come with an overhead of maintaining the user records in a database and naturally managing the security options such as password management, account expiration thresholds and resetting the user credentials.

So what if there's option that eliminates all of this and let's us design our App in such a way that users can login using a known third-party authentication such as Google Auth ? Well, Oracle APEX Social-Sign in features let's us do exactly the same. Let's see how to do it.

Configure Google OAuth Credentials:


- Login to Google Developer Console: https://console.developers.google.com

- Create a new project


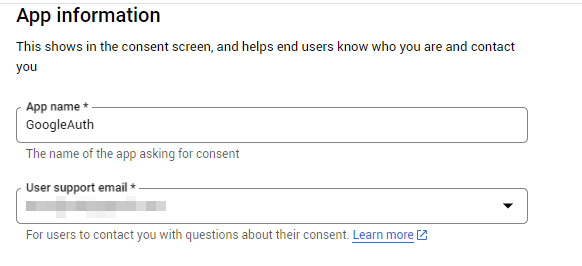
- Navigate to OAuth Consent Screen


- Create a app registration and give some name to this app and provide your email address for communication


- Scroll down and navigate to Authorized Domains section


- Enter oraclecloudapps.com as an authorized domain


The reason behind selecting this domain is that when you run your Apex App, you will see  oraclecloudapps.com domain in the App URL Hence we are going to add it to the authorized domain list in Google developer console.


- Now, let's navigate to Credentials section


- Create credentials


- Create OAuth Client Id


Select Application Type as Web Application


Provide a relevant name for use case


Authorized Redirect URLs:


Here, enter your Apex App URL till /ords part and append /apex_authentication.callback after that.


For example if your App URL looks like this https://xyz1234-abcd1234.adb.us-chicago-1.oraclecloudapps.com/ords/appname/home then enter https://xyz1234-abcd1234.adb.us-chicago-1.oraclecloudapps.com/ords/apex_authentication.callback as Redirect URL.


- Click Create


- This will create a new Client Id and Client Secret. Make a note of these values.


- Navigate to the Apex App we want to incorporate with Google Auth


- Navigate to Shared Components


- Navigate to Credentials option under Workspace Objects


- Create a new Web Credential


- Provide a relevant name like Google Auth


- Select Authentication Type as OAuth2 Client Credentials Flow


- Provide Client ID and Client Secret obtained from Google developer console.


- Apply Changes


- Now, navigate to Shared Components


- Navigate to Authentication Schemes under Security section


- Create a new Authentication Scheme


- Enter a relevant name to scheme


- Select Scheme Type as Social Sign-In


- Select our newly created Credential Store 'Google Auth'


- Select Authentication Provider as Google


- Apply Changes


- Make sure the newly created Authentication Scheme is set as active scheme. If not, then click Make Current Scheme button to set it as an active scheme for the App.


- And that's it ! We have finished all the configuration to authenticate our App using Google Auth.


- Let's run the application.


- Voila ! We are presented with the familiar Google Auth screen that will let you login with any of your Google Accounts or will show you the active Google Accounts based on your active browser sessions.


- Once, we select any of our Google accounts (or login using a new one), the authentication will be complete and we will enter our application.


Note:

With all above configurations, we created Google Auth credentials only to enable the Google Auth feature for the Oracle APEX domain.

The Oracle APEX App as well as the Google Developer account do not capture or store other users' login credentials nor share the Google account details used to setup the Credentials Store with anyone else.

This method is safe and low maintenance and it only facilitates the authentication to our App using Google Auth.


Share:

Thursday, June 5, 2025

How to fix Timezone issue with dates in Oracle Fusion BI Publisher reports

Typically, the timezone issues in Oracle Fusion BI Publisher reports often arise due to differences between the database timezone, BI Publisher server timezone, and user session timezone.

When you use dates in Oracle Fusion BI Publisher reports, either in where conditions to compare with effective dates or filtering out the data based on date parameters of the report, sometimes the report shows data pertaining to the previous day instead of today's date that was passed in parameter (or was the actual effective date).

The reason behind this is the conflict between the Timezone set at user profile level and the Timezone at BI server level.

By default, BI Publisher may use the database timezone, which can lead to discrepancies when users from different regions view reports.


There are a few ways to fix this problem.


Method 1 - Report Properties:


- Open the report definition


- Navigate to Properties


- Navigate to Formatting tab


- Scroll down to FO Processing section


- Find the option named Report Timezone and set it to User


- Save the report


- With this change, the report should work based on the user Timezone in all the dates. If the user A has Timezone set to EST then the output will be according to that, if another user B has Timezone set to CST then that output will be based on Central Timezone.


Method 2 - Data Model:


- If one wants BI server to use a dedicated Timezone in all cases, then the configuration has to be made at Data Model level


- Navigate to the desired data model of the report


- Edit the query and modify the reference to the date column as shown below. I'm using SYSDATE as the basis column for my example and Central Timezone for my example.


SELECT
    to_char(CAST((from_tz(CAST(sysdate AS TIMESTAMP),
                          '+00:00') AT TIME ZONE 'America/Chicago') AS DATE),
            'DD-MON-YYYY') AS formatted_date
FROM
    dual


- View the output and we should see the date will be correctly shown based on Central Timezone


Method 3 - Template:


- If the timezone issue is happening only with the displayed format then we can update the BI Publisher RTF or XSL template to apply the correct timezone format.

- RTF Template: We have to use <?format-date:....> function to format dates correctly.

For example:

<?format-date:CREATION_DATE;'MM/dd/yyyy HH:mm:ss z';'America/New_York'?>


- XSL Template: We can use format-dateTime function to format dates correctly.

For example:

<xsl:value-of select="format-dateTime(CREATION_DATE, '[MM/dd/yyyy HH:mm:ss z]', 'America/New_York')"/>


Additional Checks:


In addition to all above methods, it's also recommended to verify if the Fusion application environment is reflecting the correct timezone or not.

To ensure this, check below steps:

- Navigate to Setup and Maintenance.


- Search for Manage Administrator Profile Values.


Ensure the values for below ones are set correctly:


FND_TIMEZONE


FND_SERVER_TIMEZONE


FND_TERRITORY


Share: