In this blog, I'll walk through how to extract data from Oracle Fusion using BICC (Business Intelligence Cloud Connector) and interface it into Oracle Autonomous Data Warehouse (ADW) using OCI Data Integration Service (OCI-DI).
We’ll use a supplier example to demonstrate the process.
We’ll use a supplier example to demonstrate the process.
Step 1: Create a Custom Offering in BIC
The first step is to set up a custom offering in BIC using a Public View Object (PVO).
You can access to the Oracle Fusion BICC console typically by navigating to https://<your-fusion-host>/biacm
You can access to the Oracle Fusion BICC console typically by navigating to https://<your-fusion-host>/biacm

What is a PVO?
A PVO is a Public View Object that provides a structured way to access base tables in Oracle Fusion Cloud. Some PVOs are extract PVOs, which are optimized for extraction. Non-extract PVOs may run larger queries in the background.
Example:
We created a custom offering using the Supplier PVO.

Storage Configuration:
Storage Configuration in BICC lets us connect BICC with OCI Object Storage so that the data extracts can be staged over the Buckets in the object storage.


BICC keeps the private key for signing. You will paste the public key into the OCI Console for the user specified above.
In OCI Console, add the exported public key to the OCI user.
In OCI, create or identify the Object Storage bucket and note the following:
Bucket name
Namespace
Tenancy OCID
Region / host URL
User OCID for the OCI user you'll authenticate as.
Bucket name
Namespace
Tenancy OCID
Region / host URL
User OCID for the OCI user you'll authenticate as.
The OCI user must be able to read/write the bucket (appropriate IAM policies must be in place).
In BICC, navigate to Configure External Storage -> OCI Object Storage Connection
Fill-in the fields as required:
Name: Friendly name for this connection.
Host: Object Storage endpoint URL for the region.
Example: https://objectstorage.<region>.oraclecloud.com
Example: https://objectstorage.<region>.oraclecloud.com
(e.g. https://objectstorage.us-ashburn-1.oraclecloud.com).
Tenancy OCID: Paste the tenancy OCID you copied earlier.
User OCID: Paste the OCI user OCID for the user that will be used to access the bucket.
Namespace: The object storage namespace for your tenancy.
Bucket: The bucket name you created/are using.
In the OCI API Signing Key area click Generate API Signing Key. BICC generates a key and shows the Fingerprint.
Click Export Public Key. This will download a .pem file (public key).
BICC keeps the private key for signing. You will paste the public key into the OCI Console for the user specified above.
In OCI Console, add the exported public key to the OCI user.
- Navigate to OCI Console -> Identity & Security -> Users -> Select the user (the same OCID you entered above).
- Under API Keys, click Add Public Key -> provide the .pem file exported from BICC. Click Add.
The fingerprint shown in OCI should match the fingerprint shown in the BICC UI.
Now, navigate back to BICC console -> OCI Object Storage Connection
Now, navigate back to BICC console -> OCI Object Storage Connection
Under Verification, click Test Connection.
If all goes well, the test would succeed
Save the connection and close.
At this stage we have completed all the required configurations in Oracle Fusion BI Cloud Connector (BICC).
Save the connection and close.
At this stage we have completed all the required configurations in Oracle Fusion BI Cloud Connector (BICC).
Step 2: OCI Data Integration
Oracle OCI provides a cloud-native service named Data Integration to extract, transform, and load data.
- Navigate to OCI Data Integration.

- Go go Workspaces -> Create a workspace (e.g. BICC-ADW)

- Define data assets (connectors) for the source and target:
- Define data assets (connectors) for the source and target:
1. BICC Data Asset (Source)

2. ADW Data Asset (Target)
- Type: Oracle Fusion Applications
- Oracle fusion applications host: Provide the host of your Fusion pod
- Default connection type: Oracle BI Cloud Connector
- Provide the Fusion username and password

- Default connection type: Oracle BI Cloud Connector
- Provide the Fusion username and password
2. ADW Data Asset (Target)

- Type: Oracle Autonomous Data Warehouse
- Upload Wallet: Upload the database wallet pertaining to your ADW
- Wallet Password: Provide if applicable
- Provide database username and password
- Select the desired TNS alias from the available list

3. Object Storage Data Asset (for staging the files intermediately)

- Type: OCI Object Storage
- Namespace: Provide Namespace in which your bucket resides
- OCI Region: Select the applicable region as per your tenancy

Once above steps are completed, we should have below data assets configured:
- Type: OCI Object Storage
- Namespace: Provide Namespace in which your bucket resides
- OCI Region: Select the applicable region as per your tenancy
Once above steps are completed, we should have below data assets configured:

Step 3: Build a Data Flow
Once data assets are ready, create a project in Data Integration and define data flows:
Project:

Create a new data flow for our extracting Supplier data from BICC offering we created earlier.

Create a new data flow for our extracting Supplier data from BICC offering we created earlier.
1. Source Node:
Use the BICC data asset.
Select the custom offering as the schema.
Choose the PVO you want to extract.
Set extract strategy to incremental to pull only new or updated records.
Select “Manage” to let the OCI-DI track the last run date automatically.

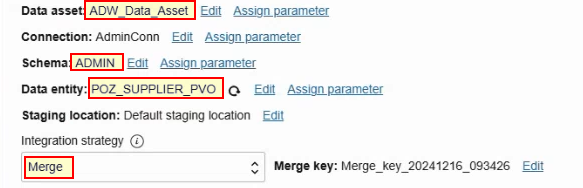
2. Target Node:
Use the ADW data asset.
Specify the schema and target table.
Set the merge strategy: new rows are inserted, updated rows are updated.
Define merge keys (unique identifiers for records).
3. Filtering:
Apply a filter based on the system variable ${SYS.LAST_LOAD_DATE}, ensuring only delta data is extracted.
This approach allows data to be pulled incrementally from BICC and merged into ADW seamlessly.

Step 4: Encapsulate Data Flow in a Task
Each data flow is wrapped in a task for execution.

Step 5: Build a Pipeline
- We can organize multiple tasks using a pipeline.
- Create a Pipeline and use the Integration Task as one of the nodes between Start and End.
- We can integrate many such nodes in Serial or Parallel manner in a Pipeline, based on the requirements.
- We can also apply conditional logic, expressions, or SQL tasks.
- Pipelines allow complex orchestration similar to Oracle Integration Cloud (OIC) integrations.

Step 6: Encapsulate Pipeline in a Task and Publish the tasks to Application
- Similar to the Data Flow, even Pipeline needs to be wrapped in a task for execution.
- Once done, Publish the Tasks to the Application

- Once done, Publish the Tasks to the Application
Step 7: Run the Pipeline
- Let's first create a new supplier (Test Supplier) in Fusion so that we can validate if this records gets interfaced to ADW once we run the Pipeline.

- Let's first create a new supplier (Test Supplier) in Fusion so that we can validate if this records gets interfaced to ADW once we run the Pipeline.
- Navigate to the OCI-DI Application
- Go to Tasks -> Locate the Pipeline Task -> Click the context menu -> Run

- OCI-DI Pipeline run can be tracked under Runs section

- OCI-DI Pipeline run can be tracked under Runs section
- Behind the scenes, OCI-DI automatically submits an ESS job to extract data from BICC.

- Data is extracted and stored as a CSV in OCI Object Storage.

- Pipeline completes Successfully and under the Integration Task node, we can see it extracted 8 new records from Fusion over to ADW

Step 8: Verify the data
- As we can see, the newly created supplier (Test Supplier) has been successfully interfaced over in ADW

Conclusion:
OCI Data Integration (OCI-DI) provides a powerful, cloud-native way to move data from Oracle Fusion BICC into Autonomous Data Warehouse (ADW) seamlessly. By leveraging features like incremental extraction, managed load strategies, and merge operations, organizations can avoid heavy full-load extractions and instead synchronize only the data that has changed since the last run. This not only improves performance and reduces costs but also ensures that ADW always reflects the latest state of Fusion data with minimal lag.
With its intuitive workspace, reusable data assets, and orchestration pipelines, OCI Data Integration enables teams to design and automate robust data flows across multiple PVOs and Fusion modules. Combined with BICC’s ability to export data securely to OCI Object Storage, the solution establishes an efficient and scalable data integration pattern that supports daily refreshes, near-real-time reporting, and downstream analytics with confidence.
0 comments:
Post a Comment